Batteries Make it Better!
Elec-Trak Battery Installation - Large Frame
Elec-Trak Models E12, E12M, E15, E20
GEZ-5313D
FORWARD COMPARTMENT
REAR COMPARTMENT
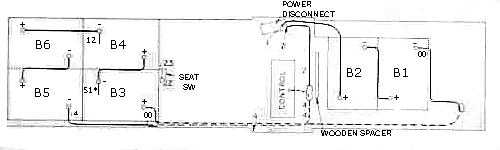
Figure 1
GEZ-5313D
|
CAUTION: To insure proper tractor operation, check all the batteries prior to installation for cracks, defects, polarity, and electrolyte level. Avoid touching tools or cables to the tractor frame while installing and hooking up the batteries. Editor's note: wrapping the wrench handle in electric tape is recommended to provide an extra margin of safety. |
FORWARD COMPARTMENT
- Remove all loose parts from the forward battery compartment. Disengage the power disconnect.
- Place the plastic tray in the bottom of the forward battery compartment so that the drain hole lines up with the drain hole In the frame.
- Unfold the smaller poly bag and place it in the tray so the bag's bottom seam runs from front to rear Flatten the pockets that form at the seam ends so the bottom of the bag conforms to the tray.
- Carefully set the batteries in the bag as shown in Figure 1 (below) so that the sides of the bag remain above the top battery surface in equal amounts.
- Insert the black wooden spacer between the bag and the front side of the control panel.
- Connect the battery cables in accordance with Figure 1. Coat the terminals after connections are made with a thin coat of grease. Make sure that all surfaces are coated.
- Place the plastic cover over the batteries and inside the bag, making sure the battery cables go through the end slots of the cover.
- Place the hold-down clamps along the sides of battery cover but outside of the bag so the bag is held captive between the clamps and the cover.
- Place the "U-shaped" bracket over the batteries so that each end engages the right angle piece on each hold-down clamp.
- Slide the flat metal brace through the slots in the side panels until its center hole lines up with the threaded hole in the "U" bracket.
- Screw the thumb screw into the threaded hole finger tight.
REAR COMPARTMENT
- Remove all the loose parts from the rear battery compartment.
- Connect the seat switch wires (numbers 22 and 23).
- Place the plastic tray in the rear battery compartment so that the drain hole lines up with the drain hole in the frame.
- Unfold the large poly bag and place it in the tray so the bag's bottom seam runs from front to rear. Flatten the pockets that form at the ends so the bottom of the bag conforms to the tray.
- Carefully set the batteries in the bag as shown in Figure 1 (below) so that the sides of the bag remain above the top battery surface in equal amounts and all wires are accessible.
- Connect the battery cables and wires in accordance with Figure 1. Coat the terminals after the connections are made with a thin coat of grease. Make sure that all surfaces are coated.
NOTE: Attach wire number 12 under one of the bolts on the clamp of the negative post of battery B4 and wire number 51* in a similar fashion to the negative post of battery B3. - Place the plastic cover over the batteries and inside the bag, making sure the battery cables go through the side slot of the cover.
- Place the hold-down clamps along the front and rear edges of the battery cover, but outside of the bag so that the bag is held captive between the clamps and the cover.
- Secure each clamp with a screw, nut, and lockwasher at each end.
Editor's note: After installation is complete, voltages should be tested to ensure that wiring is correct as described here. - Engage the power disconnect and place the tractor on charge with the timer set to the 1-2 year position.
Figure 1
All Content Copyright © 2007-2024
Free Range Electric, LLC
Waynesboro, VA 22980
Free Range Electric, LLC
Waynesboro, VA 22980