Batteries Make it Better!
Basic troubleshooting: Voltage tests - Large frame
by Jim Coate, Free Range Electric
This information applies to the large frame Elec-Trak models, such as the General Electric E12, E12M, E12S, E14, E15, E16, E20 and I-series models, and the New Idea EGT-120, EGT-150 and EGT-200 models and Wheel Horse B-145 and C-185 models.
There are two basic parts to testing battery voltages: first testing each battery individually and second testing the batteries as a string (or "pack"). For all tests, a decent voltameter is required, accurate to 0.1 volts or better, 0-50 volts (or auto-sensing) DC.
PART 1: Batteries loose or installed in tractor
To test the individual batteries, simply connect the negative lead from the voltmeter (usually black in color) to the negative ("-") terminal of the first battery. Then connect the positive lead from the meter (usually red in color) to the positive ("+") terminal of the same battery.
A charged battery should read around 6.2 or 6.3 volts. If lower, the battery needs to be charged. If much lower (4 volts or less) one or more cells are bad and the battery may never recover even with a good charge.
Repeat this measurement for all 6 batteries. Ideally all should be within 0.1 volts of each other. Lower batteries may be individually charged to bring them up.
For new batteries, the voltages should be very consistent and 6.2 volts or higher. If not, talk to your battery supplier.
PART 2: Batteries must be installed in tractor
To test the batteries as a string, open the rear battery box and locate the terminal labeled as "NEG" on the picture below. Note this picture is taken from the middle of the tractor looking towards the back.
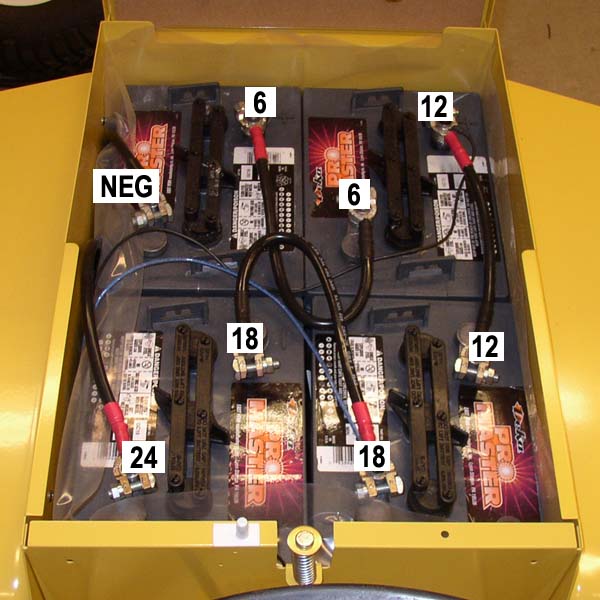
Connect the negative lead from the voltmeter (usually black in color) to the terminal labeled "NEG". Then connect the positive lead from the meter (usually red in color) to either one of the terminals labeled "6" in the picture.
The voltage should read a little over 6 volts, assuming a charged battery. Move the positive meter lead to the other terminal labeled "6" in the picture and the same voltage should be read.
Leave the negative meter lead connected to the "NEG" terminal for all tests. Move the positive meter lead to one of the terminals labeled "12" then the other. The voltage should be a bit over 12 volts at each location. Then go on to the "18" and "24" points. The voltage should keep going up as you move along. The sequence then continues in the front battery box, as shown in the next picture:
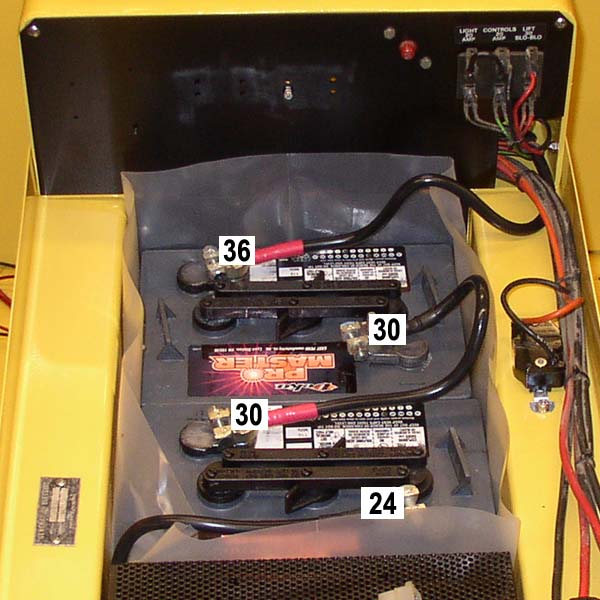
With the negative meter lead still connected to the "NEG" terminal in the rear box, continue moving the positive meter lead along the "24", "30" and "36" points in the front battery box. The voltage should again keep going up as you move along.
If the voltage goes down by 6 volts, then check if the battery is installed backwards ("+" and "-" reversed).
Note the the 6 volt increments are nominal. With a good battery pack, the actual voltages will be more like 6.3 volts, then 12.5, 18.8, 25.0, 31.3 and 37.5 volts.
This information applies to the large frame Elec-Trak models, such as the General Electric E12, E12M, E12S, E14, E15, E16, E20 and I-series models, and the New Idea EGT-120, EGT-150 and EGT-200 models and Wheel Horse B-145 and C-185 models.
There are two basic parts to testing battery voltages: first testing each battery individually and second testing the batteries as a string (or "pack"). For all tests, a decent voltameter is required, accurate to 0.1 volts or better, 0-50 volts (or auto-sensing) DC.
PART 1: Batteries loose or installed in tractor
To test the individual batteries, simply connect the negative lead from the voltmeter (usually black in color) to the negative ("-") terminal of the first battery. Then connect the positive lead from the meter (usually red in color) to the positive ("+") terminal of the same battery.
A charged battery should read around 6.2 or 6.3 volts. If lower, the battery needs to be charged. If much lower (4 volts or less) one or more cells are bad and the battery may never recover even with a good charge.
Repeat this measurement for all 6 batteries. Ideally all should be within 0.1 volts of each other. Lower batteries may be individually charged to bring them up.
For new batteries, the voltages should be very consistent and 6.2 volts or higher. If not, talk to your battery supplier.
PART 2: Batteries must be installed in tractor
To test the batteries as a string, open the rear battery box and locate the terminal labeled as "NEG" on the picture below. Note this picture is taken from the middle of the tractor looking towards the back.
Connect the negative lead from the voltmeter (usually black in color) to the terminal labeled "NEG". Then connect the positive lead from the meter (usually red in color) to either one of the terminals labeled "6" in the picture.
The voltage should read a little over 6 volts, assuming a charged battery. Move the positive meter lead to the other terminal labeled "6" in the picture and the same voltage should be read.
Leave the negative meter lead connected to the "NEG" terminal for all tests. Move the positive meter lead to one of the terminals labeled "12" then the other. The voltage should be a bit over 12 volts at each location. Then go on to the "18" and "24" points. The voltage should keep going up as you move along. The sequence then continues in the front battery box, as shown in the next picture:
With the negative meter lead still connected to the "NEG" terminal in the rear box, continue moving the positive meter lead along the "24", "30" and "36" points in the front battery box. The voltage should again keep going up as you move along.
If the voltage goes down by 6 volts, then check if the battery is installed backwards ("+" and "-" reversed).
Note the the 6 volt increments are nominal. With a good battery pack, the actual voltages will be more like 6.3 volts, then 12.5, 18.8, 25.0, 31.3 and 37.5 volts.
All Content Copyright © 2007-2024
Free Range Electric, LLC
Waynesboro, VA 22980
Free Range Electric, LLC
Waynesboro, VA 22980